 ← Back
I wanted a security blog that I fully controlled — no managed platforms, no vendor lock-in, just a VPS and a stack I could understand end to end. This is how I built byte-guard.net from scratch on a Hetzner cloud server using Ghost, Nginx Proxy Manager, and Uptime Kuma, all running in Docker.
Why Self-Host?
Platforms like Medium or WordPress.com are fine for getting started, but they come with trade-offs: limited customization, no control over your data, and someone else's rules about what you can publish. For a security-focused blog, I wanted:
- Full ownership of my content and data
- The ability to run additional tools on the same server (status pages, paste bins, CVE trackers)
- A setup I could document and teach others to replicate
- Low monthly cost
Choosing the Server
I went with a Hetzner CPX22 in their Helsinki data center. The specs:
- 3 vCPUs (AMD)
- 4 GB RAM
- 80 GB NVMe storage
- 20 TB traffic
This is more than enough for a Ghost blog, a reverse proxy, and a monitoring dashboard. Hetzner's pricing is hard to beat for what you get, and their Helsinki location gives solid latency across Europe.
The Stack
Here's what runs on the server:
| Service | Purpose | Port |
|---|---|---|
| Ghost | Blog engine | 2368 |
| Nginx Proxy Manager | Reverse proxy + SSL | 80, 443, 81 |
| Uptime Kuma | Status/monitoring page | 3001 |
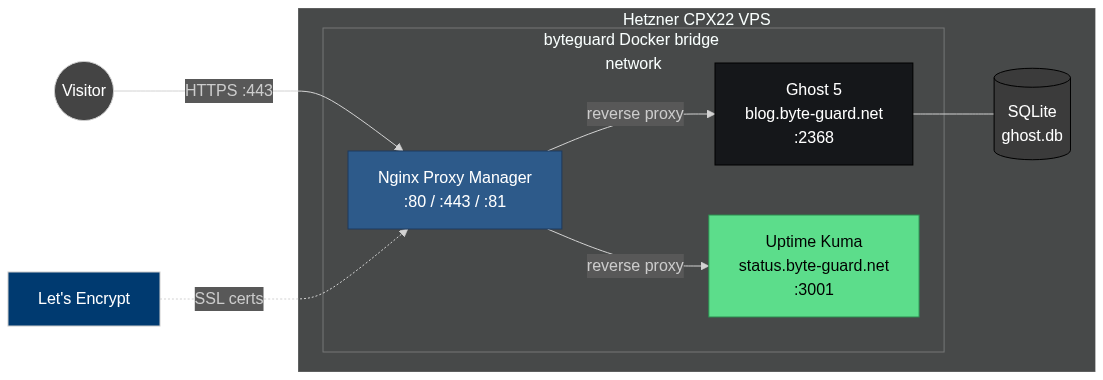
The byte-guard.net stack: NPM terminates TLS and reverse-proxies Ghost and Uptime Kuma over a shared Docker bridge network.
Everything runs in Docker, managed by a single Docker Compose file at /opt/byteguard/docker-compose.yml.
Want the full list of tools and services powering this site — VPS providers, security tools, the self-hosted stack, and the books I learned from? See my resources page.
Step 1: Initial Server Setup
After provisioning the VPS from the Hetzner Cloud console, I SSH'd in and did the basics:
# Update the system
apt update && apt upgrade -y

# Create a non-root user
adduser $user
usermod -aG sudo $user

# Set up SSH key authentication
mkdir -p /home/$user/.ssh
cp ~/.ssh/authorized_keys /home/amine/.ssh/
chown -R amine:amine /home/$user/.ssh

# Disable password authentication
sed -i 's/#PasswordAuthentication yes/PasswordAuthentication no/' /etc/ssh/sshd_config
systemctl restart sshd
Then I configured the firewall:
ufw allow OpenSSH
ufw allow 80/tcp
ufw allow 443/tcp
ufw enable
Step 2: Install Docker and Docker Compose
# Install Docker
curl -fsSL https://get.docker.com | sh
usermod -aG docker amine

# Verify
docker --version
docker compose version
Step 3: Set Up the Project Directory
mkdir -p /opt/byteguard
cd /opt/byteguard
Step 4: Write the Docker Compose File
Here's the docker-compose.yml that powers the entire site:
version: "3.8"

services:
  ghost:
    image: ghost:5
    container_name: ghost
    restart: always
    environment:
      url: https://blog.byte-guard.net
      database__client: sqlite3
      database__connection__filename: /var/lib/ghost/content/data/ghost.db
    volumes:
      - ghost_data:/var/lib/ghost/content
    networks:
      - byteguard

  npm:
    image: jc21/nginx-proxy-manager:latest
    container_name: nginx-proxy-manager
    restart: always
    ports:
      - "80:80"
      - "443:443"
      - "81:81"
    volumes:
      - npm_data:/data
      - npm_letsencrypt:/etc/letsencrypt
    networks:
      - byteguard

  uptime-kuma:
    image: louislam/uptime-kuma:1
    container_name: uptime-kuma
    restart: always
    volumes:
      - kuma_data:/app/data
    networks:
      - byteguard

volumes:
  ghost_data:
  npm_data:
  npm_letsencrypt:
  kuma_data:

networks:
  byteguard:
    driver: bridge
Key decisions here:
- SQLite over MySQL — Ghost supports SQLite natively, and for a single-author blog the performance is identical with zero extra resource usage.
- Shared Docker network — All services communicate internally over the
byteguardbridge network. Only Nginx Proxy Manager exposes ports to the internet. - Named volumes — Data persists across container rebuilds.
Bring it all up:
cd /opt/byteguard
docker compose up -d
Step 5: Configure DNS
Over at my domain registrar, I added three A records pointing to the Hetzner VPS IP:
blog.byte-guard.net    → <VPS_IP>
status.byte-guard.net  → <VPS_IP>
byte-guard.net         → <VPS_IP>
Step 6: Configure Nginx Proxy Manager
Nginx Proxy Manager (NPM) has a web UI at port 81. After logging in with the default credentials and changing them immediately, I set up proxy hosts:
For Ghost (blog.byte-guard.net):
- Forward hostname:
ghost - Forward port:
2368 - SSL: Request a new Let's Encrypt certificate, force SSL
For Uptime Kuma (status.byte-guard.net):
- Forward hostname:
uptime-kuma - Forward port:
3001 - SSL: Request a new Let's Encrypt certificate, force SSL
Because all containers share the byteguard Docker network, NPM can reach them by container name. No need to expose individual service ports to the host.
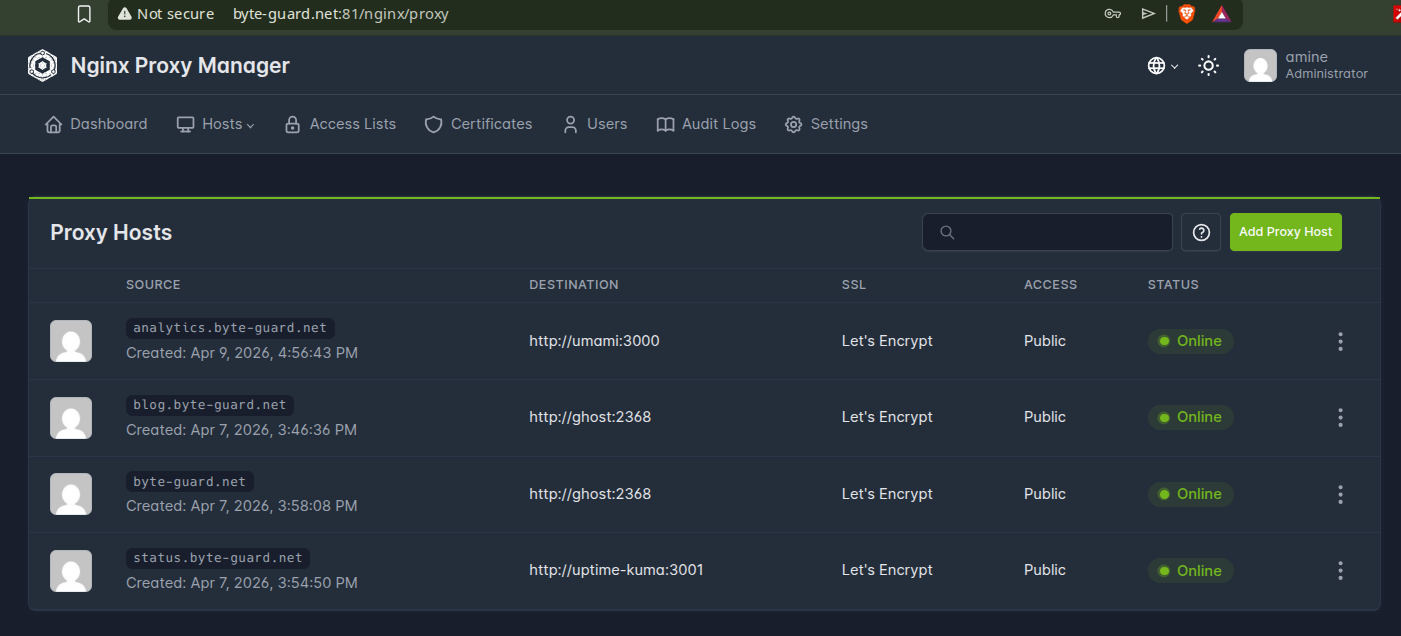
Nginx Proxy Manager after the Ghost and Uptime Kuma proxy hosts are configured. NPM talks to each container by name over the shared Docker network.
Step 7: Set Up Uptime Kuma
With Uptime Kuma running at status.byte-guard.net, I added monitors for:
blog.byte-guard.net— HTTP(S) check every 60 seconds- Ghost container — Docker host check
- The VPS itself — Ping check
I also set up a public status page so anyone can check if the blog is up.
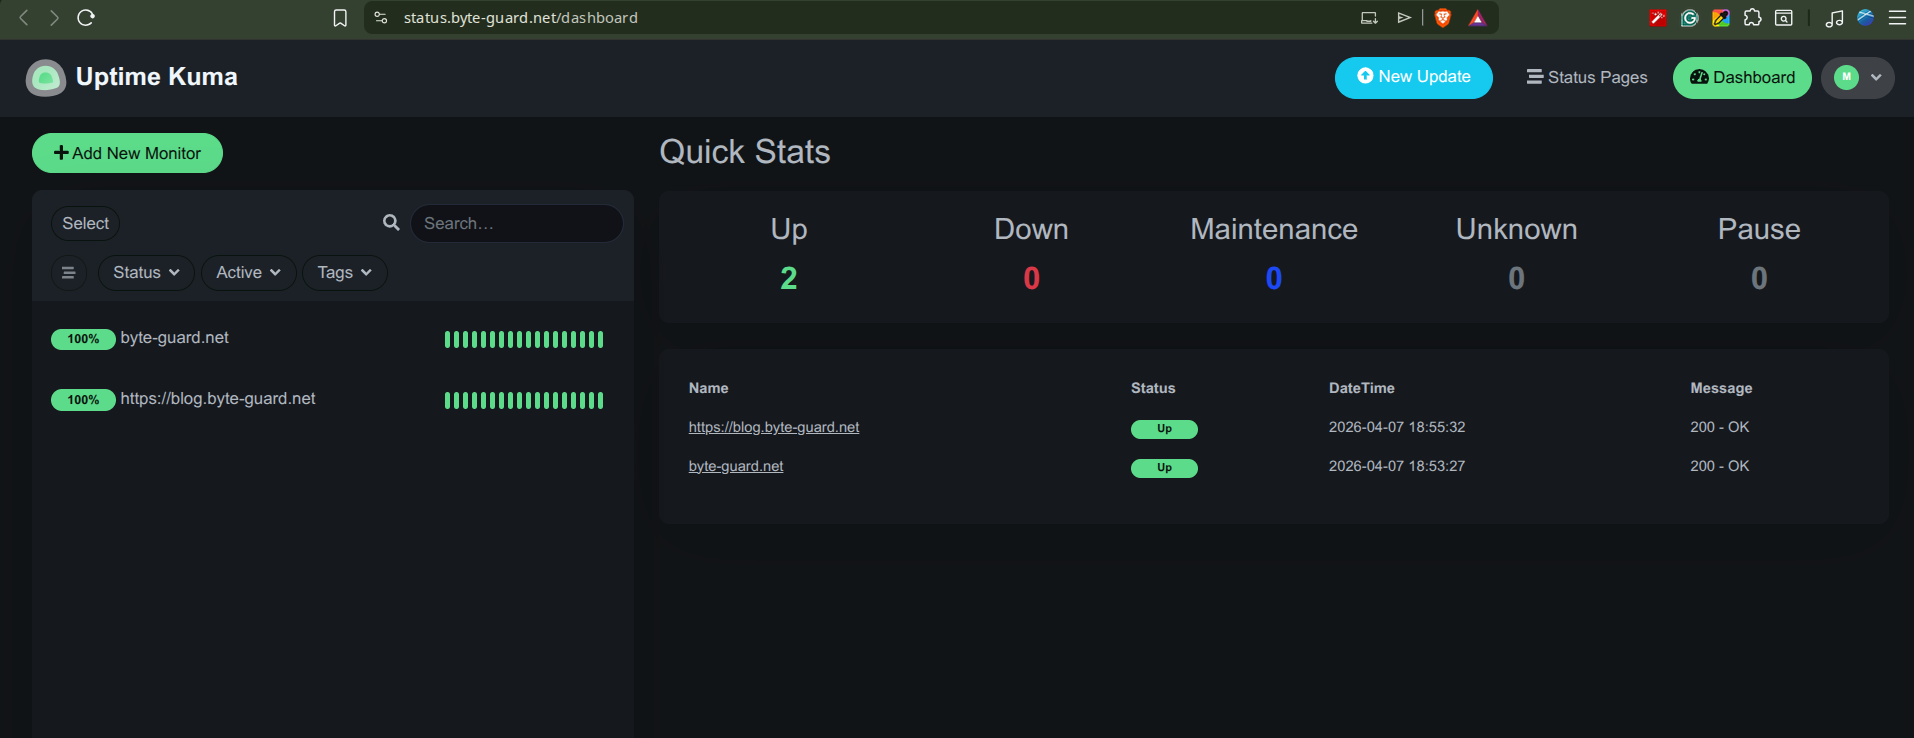
Uptime Kuma watching byte-guard.net and blog.byte-guard.net — two green monitors, zero incidents. Takes about 5 minutes to set up.
Step 8: Lock Down the Admin Panel
A few important security steps after everything was running:
# Restrict NPM admin panel to my IP (via UFW)
ufw allow from <MY_IP> to any port 81

# Block port 81 from everyone else
ufw deny 81/tcp
I also enabled 2FA on the Ghost admin panel and Nginx Proxy Manager.
What It Costs
| Item | Monthly Cost |
|---|---|
| Hetzner CPX22 | ~€7.50 |
| Domain (byte-guard.net) | ~€1/mo amortized |
| SSL certificates | Free (Let's Encrypt) |
| Total | ~€8.50/mo |
A fully self-hosted blog with monitoring and SSL for under €10/month.
What's Next
This is just the foundation. Upcoming additions:
- tools.byte-guard.net — Security utilities built with FastAPI
- cve.byte-guard.net — A lightweight CVE tracker
- paste.byte-guard.net — A self-hosted paste bin for sharing code
- Arabic translations — Bilingual content starting in a few months
- N8N automation — Already running on a separate Contabo VPS for content workflows
Lessons Learned
- Start simple. Docker Compose with SQLite is plenty for a blog. You can always add complexity later.
- Nginx Proxy Manager saves hours. Manually configuring Nginx and Certbot is educational but NPM gets you to the same place with a GUI and auto-renewal.
- Monitor from day one. Uptime Kuma took 5 minutes to set up and has already caught a DNS propagation issue I would have missed.
- Document everything. This blog post is as much for future-me as it is for you. When I inevitably need to rebuild or migrate, I'll have a complete reference.
If you're thinking about self-hosting your own blog, I hope this helps you get started. The whole setup took an afternoon, and running costs are minimal. Feel free to check out the status page to see it all in action.
Once your server is running, I'd recommend hardening your VPS as the very next step — it takes 10 minutes and closes the most common attack vectors. Then lock down your containers with Docker security best practices so your self-hosted stack isn't running with dangerous defaults.
Free download: I compiled every hardening step into a printable checklist you can pin next to your monitor. Grab the Server Hardening Checklist (PDF) — no signup required.

Comments
Sign in with GitHub to comment. Threads live in the byteguard-comments repo.